The brake calipers are of utmost importance to a vehicle. Be it a car, truck, bike, or anything. But do you know that the calipers lose their potential over time? Is not that very natural? Everything loses its true potential as time flows.
Yes, the calipers lose their compression over time, and then you need to re-compress the calipers; if you get to see such damage, replacing the calipers is always recommended.
Do you know how to compress the brake caliper? Or you do know but are not sure if you are right? No worries, I will help you with the process, and that is why I have this article.
Before we jump to the main section, let us revise a brake caliper, and how does it work?
TABLE OF CONTENTS
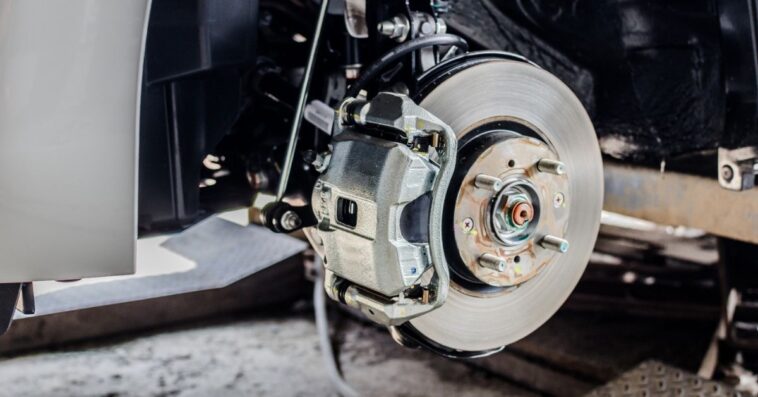
What Is A Brake Caliper?
The calipers in your car are a specific element that plays a very crucial role in your car’s braking system. The caliper has a cubical-box-like structure that fits the disc rotor and works to stop your vehicle.
If you want to learn about how these calipers can stop your vehicle, well, you have to read the next sub-section.
How Does My Car’s Brake Caliper Work?
To know how it works, you need to know what parts are involved in this procedure.
The parts are:
- Wheel Assembly
- Rotor Disc Brake
- Caliper Assembly
- Wheel
- Wheel Nuts
The wheel assembly holds on to the disc rotor and wheel. And the bearings inside allow their charming rotation.
The rotor disc is the particular part that the pads jam against. This will generate sufficient friction that retards the spin of your wheel. The rotor disc generates a tremendous amount of heat because of the friction. Also, the bored holes in the disc offer air to take out the generated heat.
The assembly of the brake caliper uses hydraulic strength for the pedal to crush the rubber braking pads hooked onto the rotor surface. Hence, building friction then slowing the wheel.
The assembly of the brake caliper comprises dust boots, a caliper bracket, slider pins, an inner brake pad, a metallic frame, and a piston inside it.
This frame of the calipers has a banjo bolt that acts as the gateway for the fluid to reach the piston. The hassled liquid released from the pedal’s side pushes the piston by a greater force. Additionally, this piston is permitted to move along the slider pins to a fixed range.
Now let us learn about how this caliper works.
The brake cylinder sends out the highly pressurized hydraulic liquid received by the caliper when you apply the brake. The fluid then pushes the piston, making the inner pad squeeze onto the rotor’s surface.
Therefore, the fluid’s reluctant force pushes the frame of the caliper together with the slider pins, making the external surface of the brake pad squeeze itself against the brake rotor disk on its other side.
How To Compress Brake Caliper
Now that we finally know what a brake caliper is and how it functions, it is time to move ahead with the article. Read along the lines so that you can fully understand the procedure.
Here is how you should compress a brake caliper in the easiest way possible.
To do this, you will need some basic gears. Start off by dismantling or removing the caliper out. Next, remove the side bolts, then push the rest of it away with the help of a screwdriver.
Take out the caliper, keep it aside, and remove the caliper bracket, pads, and rotor. Remove the clips too. Do not let the caliper hang. Instead, use a bungee cord or a coat hanger. Do not let it hang from the brake hose, and it may get damaged.
Now remove the 2/13 millimeter bolts and remove the caliper. As you are in the process, make sure you clean the components as well. After you take the caliper off, get the rotor off with the help of a rubber mallet.
If you see the rotor stuck and is not coming off, try using some lubricant, and it will come off nice and easy. Sometimes, people have a hard time removing the rotor, as it gets rusty over time.
Next, you have to ensure that the spindle area (where you install the rotor) is nice and clean. It will be better if you apply some of the greases before you actually put the rotor back in its place (you can use anti-seize, but grease works just fine and is not messy at all).
Before installing the rotor back, make sure the spindle area is clean. Then, you can easily put on the rotor with just a push, and you do not have any tools for that. After installing the rotors, it is the install the caliper bracket.
Put a brake grease on the caliper bracket because when it is well-lubricated, it can slide easily and prevent rust build-up. Hold the caliper onto the rotor and put in the bolts. That’s it. You can tighten it with the help of a wrench too.
Now get ready for the cool part. It’s time to compress the caliper. To do this, you will need some oil-filtered pliers and a set of channel locks.
The oil filters can help maintain the pressure on the piston. While the oil filters do that, you can use the channel locks to spin the piston. The only that you have to keep note of is pinching the rubber boot with the pliers.
Then with the filters, put on some steady pressure and turn the caliper piston clockwise, with the channel locks.
In my opinion, I think, doing the compressing job manually is pretty faster than using the tools for compressing. If you ever have seen somebody doing this with the tools, he has an extra pair of hands to help him.
Now it is finally to reassemble the kits. Start by putting the pads in place, do not forget to apply some lubricant in there. This prevents pulsations.
Then with the help of the brush, apply some silicone inside the caliper slides. This allows the caliper slides to move nice and free. Always use silicone for the brake slides, as common greases may deteriorate over time.
Now put the caliper back and start inserting the slides by hand so that the threads do cross. Later, tighten it using a torque wrench. Lastly, put on the clipper clip back in place and clamp around the bracket. And it is done.
Here’s the great YouTube video:
How Do I Use A Compressor For Compressing My Caliper?
Compressor kits are very costly, but they provide all the tools and gears you need to compress your caliper. In addition, it contains a variety of attachments for different types of caliper pistons and has two different bolts.
First, you need to find the right size adapter that will fit perfectly onto your piston. Because if it fits perfectly to the slots, there will lesser chance of it sliding off when you tighten it.
Now put the adapter on the bolt. The bolt assembly has slots that will hold on to the adapter. Now put the piston tool through the plate, connect it to the piston slots, and turn on the bolts to tighten it. Your setup is ready.
Now, grab the handle of the piston tool and rotate it. This will rewind the piston and compress the caliper.
Why Do I Compress My Brake Caliper?
Now you know how you should do the compression properly, but do you know why you should compress your brake calipers?
When you are busy enjoying your car ride, there are some parts that are going through constant wear and tears whenever you apply the brakes.
As a result, the brake pads go thin.
Now when you let go of the brake, the brakes rewind, and the brakes get compressed. But this does not continue if the brakes are wearing out. This makes the caliper and the piston fall out.
When the caliper is hanging, it gets closer to the rotor disc, and that is why you hear a grinding noise whenever you apply the brakes.
To prevent this, new pads are installed, and the calipers are re-compressed to retain the performance.
Are You Having Trouble Compressing Your Caliper Piston?
You are unable to compress your caliper is probably because of the following reasons below:
- If your vehicle has been inactive for months, you might encounter some issues when compressing your caliper. Inactivity of a vehicle promotes rust built upon its components.
- If the piston is not sliding around the seals, this can be a reason that your caliper piston is not compressing.
What Do I Do If My Caliper Is Not Compressing?
Say you have a brand-new rotor and brand-new brake pads, and your caliper is not compressing. You probably wonder, you have brand new components, but why is not the caliper compressing?
This is happening because your caliper is stuck. To free it, you need to use two C-type clamps. I have a clever way of doing this.
Use a clamp to get the grip normally and use another reverse and hold the area. When two C-type clamps combine, it will help you get even more pressure on the area.
If you turn both the clamps together, it will give you high pressure, and you can compress your caliper.
This is how you should compress your caliper when your caliper is stuck.
Frequently Asked Questions
Q1. How Do I Know If I Have A Faulty Brake Caliper?
If you suspect that you have a faulty brake caliper, then you might want to look for these signs below:
- Brake fluid on the wheel can be found when the caliper seal fails, brake fluid leaks, and results in loss of hydraulic pressure.
- The caliper is seized; it will constantly rub itself on the rotor disc. This will produce a loud grinding noise.
- If your caliper is bad, you will be unable to compress the caliper when replacing your brake pads.
- Your car will not move in either forward or backward direction when the shifter is in the drive.
- Uneven brake pad wearing.
Q2. How Much Time Will My Brake Caliper Last?
Brake calipers are pretty durable and are expected to last a very long time. In terms of time, you can expect it to last for at least ten years, and in terms of miles, these can efficiently serve you for nearly 75,000 to 100,000 miles.
Conclusion
After reading this “How To Compress Brake Caliper” guide, are you satisfied with the answers?
This guide is written after thorough research and experience, so you can trust the process and get your caliper compressed.
In this guide, I have explained the steps you can follow to get the caliper compressed. If you have the compressor kit, you can use it, but you can use regular tools to compress the caliper if you do not have one. Pay attention to the notes I have left for you.
I have tried my best to elaborate on the steps as far as I can. However, do not rush with the procedure. Take your time. Any hasty step can damage your brake caliper.
I hope this write-up was resourceful to you, and now it is time to get your caliper compressed.