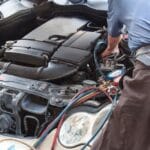
You need to change your car’s battery at some point in your battery’s life span, especially when it has served its time.
As with time, it starts to lose its potential to charge your car. If you do not replace it with a new one, it might get swollen and damage your car’s engine.
Although, this is a common problem with the expandable cells with inferior features. If your car has a powerful but weakened battery, there is a simple [procedure that can help you restore its potential.
The method that I’m going to share with you, known as reconditioning. To be able to do it successfully, there are several steps you need to do as directed.
Reconditioning your old car battery is not that complicated as it sounds. But it is pretty easy, and you can do it all by yourself. All you would need is some equipment, time and a car battery of course.
It saves a bit of your money and keeps our mother Earth. Once you do it right, it will look no different than a newly bought battery. Also, you can earn some bucks by selling it.
So, let’s get started. Here is how to recondition a car battery that won’t hold a charge.
TABLE OF CONTENTS
6 Steps To Fix Your Car Battery That Won’t Hold A Charge
Before we begin with the procedure, it would be best to get a hold of these materials mentioned below. And, when you perform the task, stay alert and cautious.
Materials Required
- Eyewear or Safety goggles and gloves made of good quality fabric
- A set of cloth to clean and catch the spills or an apron is always better
- A battery charger
- Voltmeter
- A tool kit (screwdriver kit)
- A medium or big sized funnel
- Two medium-sized plastic buckets
- A distilled water container
- Epsom salt
- Baking soda
- Steel wool/Wire Sponge
- Brush
- Battery load checker (if any)
Step 1. Exterminate The Dust
First, you need to look if there is dirt on your car’s battery. Accumulation of dirt can sometimes create issues in conducting electricity. Also, I would like if you to prepare a baking soda solution.
To make the solution, take a bowl and some of the baking soda. Then pour some distilled water and mix it well. The solution should look like a drippy paste.
So, you can start by checking for rust on the battery’s terminals. Different battery companies use different sizes, make you try to understand every single part of your unit.
If you see any corrosion on the battery terminals, dip the steel wool or wire sponge (whichever you are using) in the baking soda solution, and clean the unit.
To clean the post or terminals of the car battery, you need to use a brush and scrub the terminals.
If you see there are tough stains, use steel wool instead. While cleaning, you may see foam near the posts.
Do not be worried if you see so. It’s very natural, and this foam takes place due to some chemical reaction, and it is pretty safe.
Clean the unit thoroughly for two rounds with baking soda. When done, clean the moisture and let it dry.
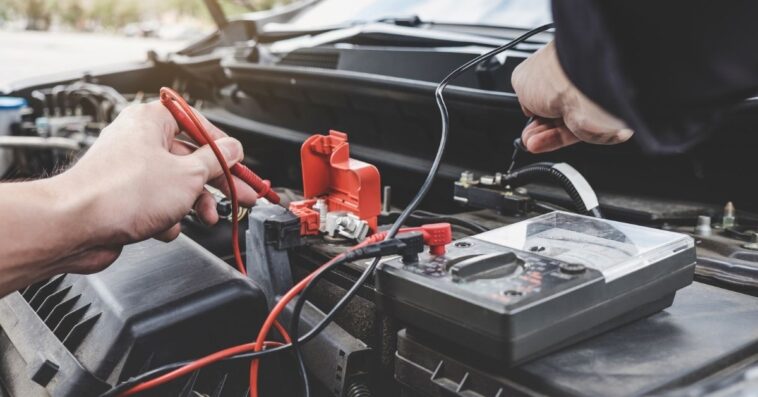
Step 2. Check The Voltage Of The Cell
To check the voltage of the cell installed in your vehicle, you need a voltmeter. This tool is pretty essential to use, and if you are trying to recondition your battery, you will be able to use it.
Follow the steps. Also, you do not need to search a lot for it, and you can quickly get it at your nearest hardware shop.
Now, as you know, a battery has two terminals. One is positive, while the other is negative.
So, turn your car off, and you have to connect the clips of the voltmeter to the respective terminals of the battery and take the reading.
Check the voltmeter and see what it reads. If it gives, you’re reading less than 12.6 volts, it means the battery needs you to work on it. If it goes down to 9.5 Volts, consider replacing the battery.
Again, you shall re-establish the connection.
Again, make a secure connection by connecting the clips of the voltmeter to the respective ports of the cell. This time, turn on your accessories like the speakers, lights, etc.
Check the voltmeter if it reads a revised voltage of 10 volts or more, then the battery is fine, but if it is reading below five while the car is on, you may consider replacing the battery.
Step 3. Get The Cell Contents Out
This step can be tricky, so put on your apron or a protective cloth, and put on your safety glasses.
Don’t forget to wear gloves, and batteries contain hazardous fluids that can cause skin irritation if exposed. And then do as directed.
Use your screwdriver underneath the cell caps and open them. Then, get the components out of the battery and store them safely for quick retrieval.
Then, place the plastic buckets near the battery. When you are set, slowly tilt the battery and cautiously dump all the cell’s fluid into the bucket.
Again, do it slowly and cautiously, do not rush when doing this as your skin can get exposed to the acidic fluids.
After emptying the cell, place it back to where it belongs.
Then, take half a pound of baking soda and add it to the acid in the bucket. You can add more baking soda to the acid because it helps in neutralizing the liquid.
If you are interested in learning about removing your car battery, then here is the article on how to change a car battery to read.
Step 4. Terminate The Dust
Now to terminate the dust, you have to prepare another solution of baking soda and distilled water. And add half a gallon of regular water to mix with the baking soda.
Open up the caps and the power in the solution with the help of a funnel, and then put the caps back. Now, shake the battery gently so the liquid inside can clean the interior of the cell.
Finally, open up the caps and dump the toxic liquid into the bucket.
Step 5. Charge The Battery
Pry off the cell caps. Because if you don’t remove the battery caps, the liquid inside might get heated up and start spilling all over the units.
Heating generates a lot of pressure, and if not released, it may result in causing severe accidents.
After removing the caps, connect the positive and negative leads of the battery charger to the respective positive and negative terminals of the cell safely.
Be sure there is enough distance between the charger to the charger, and only the leads should be connected.
Let the battery charge. Do not think of rushing with the charging. According to most experts, it takes around 36 – 48 hours for a cell to get fully recharged. So, you have no choice but to let it rest.
After the battery gets recharged, we will finally test the battery.
It is a lot of power and can potentially explode, so charge your battery in a well-ventilated place or open area.
Here’s you can learn how to charge your car battery properly.
Step 6. Test The Recharged Battery
Now it’s finally time to test the voltage of your recharged battery.
First, establish the same connection as you did in step 2nd step, i.e., connecting the positive and negative leads of the voltmeter to the respective cells of the battery.
Suppose the voltmeter gives you a reading of 12.43 volts; voila! You made it. But if it reads a lower value, continue with the charging.
If you find the cell has spilled, you might consider adding more electrolytes and charging the battery for 12 hours more.
If you wish to check the status of the battery, get your load tester. You can use the voltmeter too; you can use any of the two.
However, if you wish to use the voltmeter, then get the caps back onto the cell, connect it with your car. Then, turn on the fog lights but not the vehicle.
Let the lights be on for a couple of minutes, then with the help of the voltmeter, take the reading.
The reading should be at least 9.6 volts. However, if you get a lower reading, that means you still have work left on the battery, my friend.
If you prefer doing the cycle treatment for the battery, you can do it.
Either it offers you the voltage of 9.6 volts or fails it. However, this can be very hectic as you need to recharge and discharge energy continuously to use this method.
The cycle treatment involves creating pressure or load onto the unit by turning on the car’s accessories like lights for a couple of minutes.
After, you need to detach the battery and repeat the same steps all over again.
Before you get the desired reading of 9.6 volts, you may have to cycle the battery unit nearly four times.
When you finish off with the procedure, the battery unit will regain its potential and perform pretty well. These are the easiest ways that you can do to recondition your car.
If you do not get the required voltage, perhaps you should consider replacing the battery.
Caution
When you are about to perform a reconditioning of your car battery, you need to be sure that you pay attention to these points mentioned below:
- If you are doing the recondition all by yourself, make sure you pick a well-ventilated or open area.
- Put on thick safety gloves that can save you from any acidic spills on your skin. The acidic fluids in the battery are harmful and can cause burns.
- Get yourself the safety goggles that can protect your eyes. Also, put on the shoes to cover your feet. You cannot risk it when handling a battery.
- When handling the car battery, you are likely to see splatter from the cell. To keep your clothes safe, it would be best if you wear an apron.
How To Use A Smart Charger
A smart charger is an application-specific charger that is used to charge high voltage batteries for reconditioning. If you wish to use it, you can get it from your nearest hardware store.
The smart charger has two clamps like every other charger, and the only difference is it has colored clamps (black and red), which are required to be connected to respective terminals of the battery.
Before connecting the clips to the terminals, you need to set the smart charges to the recondition mode. To select the recondition mode, you need to read the user’s manual and follow the steps.
Connect the red clip to the positive terminal and the black clamp to the negative terminal.
The moment you plug it after connecting the clamps, it will automatically start working in some cells. While with other batteries, you need to set proper amperage.
Make sure it set the amperage low and lets it rest for 24 – 48 hours maximum for reconditioning.
If you think you can set the amperage high that fastens the charging process, and you can ride out, it will not be of any use. Putting it to high amperage will not recondition your car’s battery.
Do disconnect the charger and the battery the moment the battery gets fully charged.
If you like to know what are the best smart chargers, then you may want to read my article on Schumacher battery chargers.
Is Battery Reconditioning Important?
The up-front answer to this question is yes, it is essential.
The majority of the car owners toss their old car batteries in the trash, as they do not like the stress and tiresomeness of using the old batteries.
Therefore, they don’t have any knowledge or idea about the reconditioning procedures.
Reconditioning old car batteries refers to the process of restoring the life and potential of old batteries.
Yes, people who throw away their old and used batteries make a complete waste when these batteries can be well reconditioned and have the potential to serve for months.
Frequently Asked Questions
Q1. Is There Any Possible Alternative For Epsom Salt To Use An Electrolyte?
If you are planning to recondition your battery, but you do not have the Epsom Salt to prepare the solution, do not worry; two more chemicals can be a great alternative.
- Copper Sulphate: Copper sulfate can be a great alternative to Epsom slat. The copper sulfate is a blue-colored powder in appearance that readily dissolves in water.
- Aluminum Sulphate: Aluminum sulfate is the other great alternative to Epsom salt. When preparing the solution, the ratio of distilled water and aluminum sulfate should be 1:1.
Q2. Should I Add Vinegar Or Gatorade To My Battery When The Electrolyte Solution Runs Low?
I strictly do not recommend you add vinegar or gatorade when your battery electrolyte solution runs low because vinegar will cause the formation of lead acetate in the cell and disrupt the normal functions of your battery.
Using distilled water as the filler is better when your battery electrolyte solution runs low.
Q3. Can I Use A Regular Charger For My AGM Battery?
No, you certainly can’t use a standard charger to charge your AGM battery, and if overcharged, it may lead your battery to sudden death.
It would be best to use the AGM charger to charge the AGM battery, as its inbuilt microprocessors adjust the cell’s requirements.
Conclusion
Voila! Here it is, we have reached the end of our article. Hopefully, I have shared some of the vital details about reconditioning the car batteries.
Also, I have shared a step-by-step guide for you to follow if you wish to do all the reconditioning all by yourself.
It is not a daunting task at all, and everything is pretty quick except the charging. However, if you are doing it, take all the necessary precautions.
Battery components are hazardous and stay cautious when dealing with the chargers and voltmeters.
I hope this article has helped you. If you still have any doubts, check on YouTube for more insight. All the best!