With time you will realize that the light from your set of headlights is not as bright as it used to be initially.
This is because the plastic that usually covers the headlights will have some dirt either on its interior or exterior that inhibits quality light from going through.
At this stage, your set of car headlights will need to be cleaned immediately.
Having a clean and clear set of car headlights will give your car that appealing and admirable look. As it will be envied by others and even the lights will go through the lenses in an attractive manner.
Do you know how to clean your car headlights?
You can use either of the following 6 methods below:
- Using A DIY Headlight-Restoration Kit
- Using The Bug Spray
- Using Baking Soda And Vinegar
- Using Toothpaste
- Using Sandpaper
- Using Paper Towels
The polycarbonate plastic that is used on the lenses of the car headlights is perfect as it is tough and highly durable.
However, what makes it vulnerable to being dirty is the UV protective film that is included to protect it from too much sun.
The film gets damaged because of UV rays that make the plastic oxidize and hence light cannot pass through easily.
The headlights tend to haze and become yellowish; that is the time you will have to get them cleaned.
TABLE OF CONTENTS
Is It Important To Clean Oxidized Cloudy Headlights?
General cleanliness of the car is important, especially for the parts like the headlights or even the window.
This is quite important than even below the car which gets muddy after some time.
For the headlights they get oxidized on both the inner and outer parts, they get murky or just even get dirty, and this needs to be cleaned.
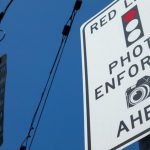
The first importance of cleaning your car headlights is for your safety when you are either driving at night or through a foggy path.
In the first instance, dirty or poorly cleaned headlights may not be able to allow enough light to pass through to lighten your path.
This interferes with your visibility as there will not be enough light the path.
This might cause you to be incapable of seeing some minor details on the roads like puddles and potholes which are quite risky driving into.
Secondly, a dirty set of headlights impairs the vision of the other cars when you are ahead of them.
The other motorists will not be able to spot your lights and hence have difficulty judging whether you are another road user.
This is the case when you are driving through a heavy downpour or even a fog.
Your headlights need to be in perfect condition for you to be well seen by other road users.
What Is The Best Way To Clean My Foggy Headlights?
There are several options you have when you want to clean your set of foggy headlights. Some of them are more effective than others.
The best option you can for to clean you car headlights is getting headlights restoration kit.
This particular kit probably has every single equipment that is needed for cleaning your car headlights in a quality manner.
It is effective as you get to clean your car headlights with the least effort.
Tools I Recommend You To Have
There are a number of methods for cleaning your car headlights. You should have either of the following to ensure that your headlights are well cleaned:
- Headlight restoration kit
- Whitening toothpaste
- Sandpaper
- Microfiber towel
- Baking soda
- Vinegar bug spray
6 DIY Methods To Cleaning Car Headlights
1. Using A DIY Headlight-Restoration Kit
Replacing your set of headlights might be avoided because it is an expensive option.
You should consider this method that will get them back to excellent form in just a matter of minutes.
The restoration kit you go for should include a plastic cleaner or polish, several grades of sandpaper, polishing cloths and a protective coating.
One kit of the DIY headlight restoration can get a pair of car headlights perfectly cleaned.
Cleaning the headlight lenses using this kit is not that much of rocket science but you will have to consider the following pieces of advice:
- Babe keen on the instructions indicated by the manufacturer. Do not try to improvise or use your own ideas.
- You should not rush to get the task completed as you may damage the headlights with the equipment in the kit.
- When sanding, you should feel for rough spots on the headlights by running your hands over them when wet. You should continue sanding until the entire surface is smooth.
- When using the sandpaper do not use it on the car’s body as it may damage the paint job. You should go for the idea of taping the sides of the headlights so that you avoid contact with the surfaces beyond that tape.
- When sanding the headlight lenses should be wet. That is why you need enough water in a bucket or a hose as the source of water.
- You should not worry about the results after sanding. While the headlights might still be hazy, the coating will take care of this in a matter of seconds.
- The headlight should be completely dried using a clean dry towel before going on to apply the protective sealant.
- You should let the sealant dry on the surface of the car headlight for some hours or even overnight. This would prevent bugs or tiny bits of dirt from sticking on your set of headlights.
- For some kits, you would be recommended to reapply the protectant after some years, maybe two years. This usually depends with the weather condition and temperature of the area you are in.

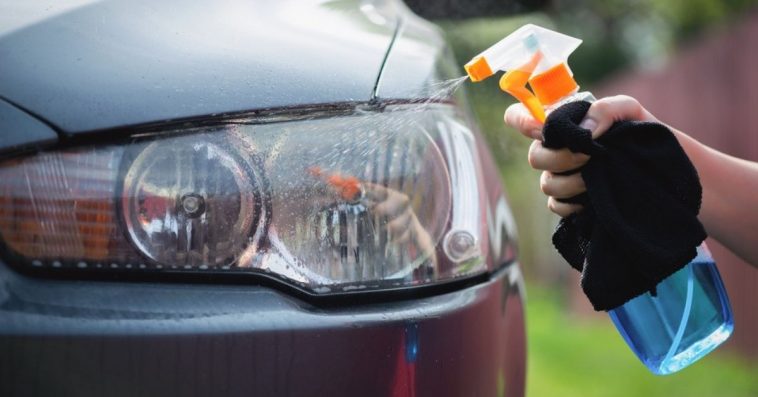
2. Using The Bug Spray
This particular cleansing options works by getting rid of the oxidation that blurs the light that comes from your car headlights.
This is among the quickest and easiest ways of cleansing your car headlights. It can also melt the film on the plastic and you get a clearer plastic.
However, the results you get from this option are quite temporary. Your car headlights would soon appear to be yellowish and dull.
3. Using Baking Soda And Vinegar
Baking soda or vinegar can be used either together or just one of them will do. A microfiber cloth can be used to rub the vinegar or baking soda on the lenses.
You do this while rinsing and repeating until you are satisfied that each lens is clean enough.
Baking soda is naturally abrasive and this helps it to be effective in getting the dirt particles removed.
However, this option is not that effective for a lens that is affected with a severe case of oxidation. In this case, you should consider a much more effective option.
4. Using Toothpaste
Regular toothpaste should be used in this method and you should avoid the gel ones.
You could increase the effectiveness of this method by adding baking soda to the toothpaste.
The toothpaste should be applied on the headlights using your fingers after cleaning the lenses. The application should be applied so that you get a good solid coat on each lens.
Use warm water to take out the residue of the toothpaste from the plastic. This takes care of the grim and grit that forms on the crevices perfectly well.
Warm water will then remove all the residue of the toothpaste from the surface. You can redo the steps for better results.
After all this, it is recommended that you add a coat of paste wax on the lenses. After it dries, buff it out.
This particular cleaning option is a better one than most since it will be long before the headlights are yellow from oxidation or dirty again.
5. Using Sandpaper
This particular method is popular since it results in long lasting results and it is highly effective.
However, it needs much of your effort and keenness to ensure no damage is done on the lenses.
For one, the paint on the car should be taken care of by taping the sides of the headlight, or you could just take out the headlights and work on them away from the car’s paint.
You can use 400, 600 and 2000-grit sand for sanding the headlights in different patterns while ensuring the finish is well done.
The surface must be kept wet at all times. After finishing you should apply wax to protect the lenses.
6. Using Paper Towels
Paper towels come into play when you are using the wet sanding method.
They ensure that you get a smooth finishing after each round of sanding with a different grit of sandpaper.
If you feel like the above measures are not bearing any fruits, you could try a professional to get the task done.
How To Clean Inside Of Headlights
For the process of cleaning the inner parts of your car headlight lenses, you will need a screwdriver, a bucket, clean water, a cleaning detergent, an abrasive pad and glass polish.
To restores your car headlights to be cleaner on the inside too, you should follow these set of instructions below:
- Open the hood of your vehicle: You should be able to spot the screws on the sides that are just where your car headlights are positioned.
For an ordinary car they should be at the front corners of the car but they tend to vary depending on the model of the car you have. Loosen this screws using a proper screw driver. - Take the headlight out of its crevice: On loosening the screws the headlights can then be lifted out of its crevice in a careful manner not to force things as this will damage them.
If the screws are still tight, you should unscrew them then unplug the electrical wires that pass current to the car headlight bulbs. You should then place the headlights on a dry towel. - Take of the lenses off from the entire set of car headlights: The make of the car headlights varies depending on the make of the car.
- Prepare the cleaning agent solution: Take a bucket and fill it with hot water and add a cleansing agent and mix properly.
- Use an abrasive pad to cleanse the inner parts of the car headlight lenses: Use the abrasive pad to gently scrub the dirt off the surface of the lenses while dipping it into the solution. You should be careful not to cause scratches on the lenses.
- Dry the lenses using a dry and clean towel: Take a towel and dry the lenses until they are perfectly dry, you should then use glass polish that will keep each of the lenses clean for longer periods. This ensures that you will not have to clean your headlight lenses for a while.
- Replace back the headlights: You should place back the car headlights in place and check the clarity of the light when you switch it on.
While performing this task, it is important that you avoid touching the reflective coating that is on the bulb.
This is normally sensitive and touching it may make it dull and hence damage the car headlights.
Frequently Asked Questions
There you go! Now you understand how to clean inside and outside of your car headlights using the tips I explained above.
I also listed some questions where people often asked in terms of cleaning their headlights.
If you are willing to know what they are, then I highly suggest you keep reading!
Q1: How Much Does It Cost To Get My Headlights Cleaned?
Cleaning your car headlights will be charged at a fee ranging between $20 and $30. Even though you will be able to view positive results this might not be that long lasting as the car headlights may soon get dirty again.
Q2: Can I Use WD-40 On My Headlights?
No, this method is not recommended for cleaning any plastic surface.
This particular method is a deceptive one and tends to cause more harm than good when put into use.
If you use this method often, you will have to buy a new set of car headlight lenses very other day.
As indicated above, car headlights are manufactured from plastic. The WD-40 is harmful to this plastic because it scuffs it and makes it soft and sticky and thus a lot of dirt gets to its surface.
This particular method might seem as an excellent option but this is usually short-lived. When used repeatedly you will damage your car headlights.
This chemical is also bad for your paint as it damages your paintwork and you will not have that perfect look that your car paintwork once had in areas around the headlights.
Q3: Can I Use Magic Eraser On My Headlights?
No, you should not use this option to cleanse your car headlights.
Magic erasers are abrasive in nature and they tend to scuff the plastic that is used to manufacture the car headlights.
This might seem to clean of the dirt but in the long run, they are quite harmful to your car headlights altogether.
Such car headlights cleaning options are normally advised but they tend to cause more harm than good to your car headlights.
Such chemicals may seem to clean the car battery perfectly well and bring some sense of clarity in the way the car lights go through.
However, they act by melting the lens and make it soft and sticky.
This then tends to attract more dirt which will then stick on the surface of the car headlights.
Soon you will have to clean your car headlights again and if you opt for this method, you will eat up your whole lenses with the chemicals and have to buy a set of new ones.
Q4: Can I Use Acetone On My Headlights?
Yes, acetone is a good choice of a cleaning agent you could use for cleaning your car headlights.
It works better than most options that would seem to have cleanse your car headlights but they will still be a bit hazy.
Q4-1: Can Acetone Damage Plastic Headlights?
Yes, it damages the plastic headlights. Even though acetone is a better option for cleaning car headlights it is not good especially for the plastic headlights.
For one, it acts by dissolving the plastic that is used in the manufacture of these headlights.
Acetone is so aggressive on the plastic headlights that when wiped off, you will be able to see prominent streaks across the plastic.
This damages the car headlight lenses and is not recommended to be done often as even though you will have clean lenses you might have to get them replaced soon because of the level of damage they will be having.
Q5: Can I Use Nail Polish Remover To Clean Headlights?
Yes, nail polish can be used to clean your car headlights. You get this done by applying it on a soft cotton rag then use the rag to wipe the car headlights.
You will know this method is effective if you realize that it gets dirtier with every wipe. You will need to get this done under a shade as nail polish dries out quite fast.
You will also have to add some more of the nail polish whenever it dries out. This shows that the nail polish is removing the dirt that once covered your headlights.
Q6: Can Rubbing Alcohol Help To Clean Headlights?
Yes, alcohol help in the process of cleaning car headlight but only as a drying agent.
Alcohol comes into use only if you want to dry a substance you had used to clean the headlights from the lenses.
Q7: Can I Use Steel Wool To Clean My Headlights?
Yes, steel wool is a great option of a remedy that can cleanse your car headlights in a simple manner.
You just have to get a white toothpaste, rub it on the car headlight lenses using the steel wool. You should then use the microfiber towel to wipe off any traces of the toothpaste.
Q8: Can I Clean Headlights With Coke?
Yes, you can use coke to clean your car headlights. This is done using phosphoric acid that is in significant amount in the bottle of coke.
If you cannot access any of the above items needed to clean car headlights, there is no need to worry as some household items may be able to do the trick perfectly well.
However, they just offer a temporary solution for the dirty car headlights.
One way to do this is using a coke drink, which accomplishes this using phosphoric acid that is among its ingredients.
The phosphoric acid is effective in cleaning stains and rust on almost any part of the vehicle.
You just have to be careful when applying the coke as it might interfere with the paint work or even the sticky residue when it dries from the vehicle’s body.
Q8-1: How To Clean Headlights With Coke
While a coke might be a cheap method you can use for cleaning your car headlights, it can damage the integrity of your car parts.
This becomes the case when you are not careful when applying this method, a good idea would be to use a spray bottle to get this task done.
The procedure for getting this done is described below:
- Empty the coke into a spray bottle.
- You can tape the sides of the headlight lenses so that the coke does not interfere with the sticky residue that holds it in place.
- Spray the coke onto the lenses, not too much.
- Let it dry for not more than a minute.
- Take a dry microfiber towel and wipe the headlights with it. You might need to spray the coke if some dirt is still visible.
- You should be able to see that the headlights have improved in cleanliness.
- The last step is to use clean water to wash off any residue that remains of the coke used in the process. You can then switch on the headlights and see how brighter it is than before.
Conclusion
Dirty and murky headlights are not only a turn down to the attractive look you desire for your car but they are a time bomb especially when you drive at night.
This is because with the headlights in this condition, they might not be able to lighten up your path well and thus you will not have the best of visibility of the road.
That is why you should always clean your headlights inside and outside for them to be clear always.
Driving a car that has foggy light may cause eye complications as when you strive to see properly using these set of lights, they impair your visibility.
You will realize this if the lights are difficult and this means you might have trouble seeing whatever is ahead.
Therefore, cleaning car headlights regularly is important and there are numerous ways to get this done; either through the restoration kit or using simple household items.
Get this done and have an easy time driving at night!
Sources:
1. TODAY – https://www.today.com/home/foggy-headlights-here-s-x-easy-ways-clean-them-t141713
2. Washos Blog – https://www.washos.com/blog/clean-headlights-guide/