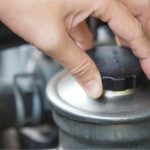
The interior of your vehicle needs to be fresh most of the time, if not at all times, regardless of the components.
You are probably going to spend most of the time in the vehicle than outside the vehicle, that is why you will need to clean the interior thoroughly.
The cleaning of the interior can be done when you have just finished the exterior parts.
One such component of the interior of your vehicle, is the leather seats-which are the best fit for any interior of a vehicle. They are also one of those components that may outlive the vehicle.
However, very few people know how to clean their leather car seats effectively.
Here’s the following steps you can follow below:
- Gather All The Required Cleaning Items
- Check For Holes In The Leather Car Seats
- Thoroughly Vacuum The Leather Car Seats
- Remove Dirt That Forms On The Surface Of The Leather Car Seats
- Scrub The Leather Car Seats
- Have The Leather Seats In Excellent Condition
- Dry The Leather Seats
- Buff Up The Seats
- Clean The Lather Naturally
- Clean Them Regularly
Cleaning leather car seats shouldn’t be difficult whenever you want to clean those in your vehicle.
This task will take far less time and effort if you have effective products and know the best cleaning process.
For an easy cleaning time, you also have to clean the leather seats regularly since when you delay the cleaning, stubborn stains and dirt particles will form on the surface of the leather.
TABLE OF CONTENTS
Type Of Leather You Have To Know Before Cleaning Your Car Seats
For your car seats, four main types of leather are used on them.
Getting to know which type of leather is used in your vehicle should help you select the best cleaning method that will provide you with satisfactory results and maintain that.
The four main types are:
- Aniline Leather: This is considered the finest leather and used for many car seats in the past. It provides a rich color thanks to the variety of dye coloring and is fairly soft.
- Semi-Aniline Leather: This is a leather type that is colored with the aniline dyes. Unlike the aniline leather, it has a protective coating that makes it highly resistant and makes the color appear uniform.
- Full-Grain Leather: This is a leather type that is used for the car seats of the high-end vehicles. It contains the natural markings that are on the hide of where the leather is extracted from. It has a more advanced protective coating that makes it highly durable.
- Corrected Grain Leather: This is designed to be more resistant leather than the other three. It provides you with a nice feeling when you touch its surface, and it varies significantly with the aniline leather.
Tools To Use For Cleaning Your Leather Car Seats
If you are going to clean your leather car seats, you will need to clean them like a pro.
This will ensure that you get satisfactory results and that when you want to clean them later, it wouldn’t be difficult.
For the effective cleaning of your leather seats, you will have to get the following cleaning items:
- A bucket
- A leather conditioner
- A car vacuum
- Clean microfiber cloth or a clean rag
- A scrubbing brush that has soft bristles
Why Is It A Good Idea To Use A Leather Conditioner For Car Seats?
For satisfactory results, when you want to clean your leather car seats, you will have to use a leather conditioner for the task.
The conditioner has a number of benefits that you will want to have for your car seats, some of them are:
- The conditioner works to repel water from the car seats: Water does not augur well with the leather on the seats.
There is nothing that repels water from coming into contact with the seats than the conditioner, which forms an invisible barrier between the two. You will not have water stains on your leather anymore. - The conditioner replenishes the leather on the seats: The conditioner prevents stains from affecting the leather on the seats.
The leather will not dissolve the stains, and this is also the same as dirt and debris won’t form on the seats.
This helps the leather seats’ longevity as both the dirt and debris decrease the lifespan of the leather. - The conditioner increases the life of the leather: The conditioner is ideal for use as it works to prevent cracks forming on the leather.
It also prevents them from drying by providing them with their natural oils that provide an excellent feeling. This will prevent damage to the leather car seats when exposed to elements like excessive sunlight that can make the leather to be brittle.
This works, making your experience with the leather car seats to be a wonderful one and also comfortable to sit on the leather seats.
Can You Use Windex On Leather Car Seats?
No, you shouldn’t use Windex on the leather seats of your vehicle.
This is not recommended because Windex contains percentages of alcohol that adversely affect the top coat of the leather used on the seats.
Even though products such as Windex or other window cleaners are mild products, using them on some type of leather will not help but will instead damage the leather seats.
You should instead maintain using the leather conditioners or a homemade conditioner that comprises vinegar and water.
However, if you don’t have any other option, you should use the Windex after performing a spot test on a small area of the leather that is not exposed.
You will have to wait for close to half an hour while you monitor the leather’s reaction to the Windex.
If you are satisfied with the results, you can start using that method and maintain using it for your particular leather seats.
This will be because the type of leather on your car seats are not negatively affected by the product.
How To Make Homemade Leather Conditioners For Your Car Seats
A homemade leather conditioner will be an excellent alternative to use if you can’t get the commercial product.
You can create your homemade leather conditioner by mixing ¾ of vinegar and ¼ of warm water.
Filling it into a spray bottle and using it just as you would use the leather conditioner will provide satisfactory results on the leather on your car seats.
I found this video that is also going to help you:
Best Way To Clean Your Leather Car Seats
Cleaning of the leather car seats in your vehicle can be accomplished if you know the appropriate process to get this done.
The following should guide you to clean your leather car seats and get satisfactory results after completing the task.
1. Gather All The Required Cleaning Items
Before any step, you will have to assemble the required cleaning items that you will need for the cleaning of your leather seats.
For the perfect and satisfactory results, you will have to do this like a pro and get the most effective cleaning items since leather can be quite difficult to clean.
You will need a bucket, leather conditioner, a scrubbing brush with soft bristles, a vehicle vacuum, and a clean microfiber cloth.
2. Check For Holes In The Leather Car Seats
After assembling the cleaning items, you will have to check for holes in the car seats. You will have to check for the holes on them and tears and perforation that are formed on them with time.
This is a crucial step because you will have to cover the openings to avoid water getting to the inside of the seats.
3. Thoroughly Vacuum The Leather Car Seats
Thorough vacuuming of the leather car seats will be needed whether or not you find holes or perforations on the leather.
The vacuum, together with the softs brush, will be needed to remove debris that is on the surface of the leather seats.
The seams will need extra attention because most of the debris usually settles on them. While using the brush, you should take care not to scratch the smooth leather on the seats.
4. Remove Dirt That Forms On The Surface Of The Leather Car Seats
It is recommended that you consult your vehicle’s owner’s manual to get the best directions on how you can clean and care for the leather seats.
After getting an idea of how to do this, a spot test might be necessary to see the cleaning method’s results.
You will then have to clean the dirt that forms on the surface of the leather seats.
You can accomplish this by using a spray bottle containing a mixture of water and leather soap or even leather cleaner.
This will help clean light dirt that oils the leather’s surface on the seats such as grease, dust, or dirt particles.
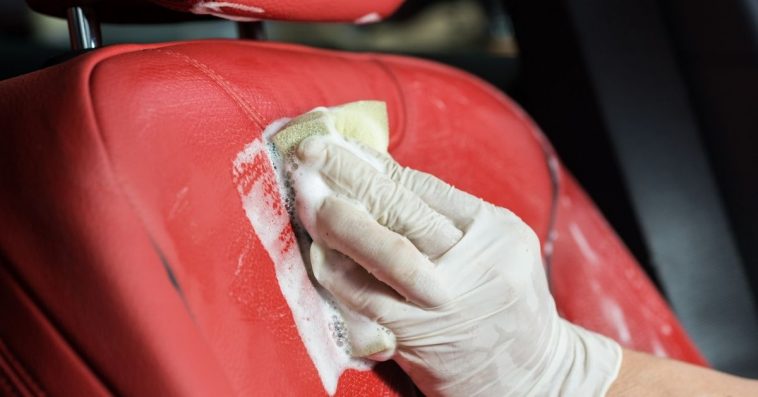
5. Scrub The Leather Car Seats
At this point, a spot test would be necessary to check the leather’s reaction when you apply a specific cleaning method.
You can get this done by targeting a small spot on the leather seat and scrub it with the soapy water.
You can then wait for it to dry up while you check the leather’s reaction to the cleaning method you have applied.
If the leather reacts well, you can then use the leather cleaning solution for the other seats.
However, if you have found perforations on the seats, you will have to minimize the use of water because you don’t want the inside of the seats to be wet.
In this case, you will have to add the soap solution to a cloth and wipe it across the leather seat.
A brush, with soft bristles, will gently scrub the leather so that the foam is activated and the dirt gets agitated and appears on the surface of the leather.
When using the brush to scrub the leather, you will have to be gentle to prevent causing scratches on the leather of the seats.
Once the dirt forms on the leather’s surface, you will have to get the clean microfiber cloth to wipe the seats. The cloth will also work to soak up a leather solution that is in excess.
If you are not satisfied with the results, you can repeat the entire process while using more cleaning solutions.
6. Have The Leather Seats In Excellent Condition
A leather seat conditioner works to restore the leather’s quality on the seats by regaining their natural oils. This will then lead to the maintenance of the quality of the leather on the seats.
This would be effective, and you would get satisfactory results if you used a good quality of a leather cleaning conditioner.
You will just have to test the conditioner before you use it by trying out a spot test, after that you can get the cleaning done on the other parts of the car seats.
To use the product sparingly, adding the conditioner to a clean microfiber cloth and then rubbing it onto the leather seats will be an excellent idea.
This will help to avoid making the leather too greasy. Similarly, it is recommended that you use just a little of the product to prevent the product from getting beneath the leather and interior parts.
7. Dry The Leather Seats
After all the above processes, you should let the leather seats dry up. You will have to leave the car for at least 12 hours and park it at a steady position that is away from too much sunshine.
Sunshine might cause excessive damage to the leather on the seats because of the UV rays.
Too much sunlight might damage the leather on the seats by causing it to form some bristles that make it less attractive.
8. Buff Up The Seats
The next step to take is buffing of the leather seats. After the leather seats have dried, you will need to get a clean and dry microfiber cloth and polish the seats in a circular motion.
This is the buffing process and will work to clean off excess conditioner that is left on the seats.
9. Clean The Leather Naturally
Using chemicals might not be your thing as you are not certain about the results that this might lead to.
You can substitute this with a homemade cleaning solution by mixing three parts of vinegar and one part of warm water.
You can then fill the solution into a spray bottle and use a clean cloth to have the leather seats well cleaned. In this case, too, you will have to get a spot test done.
10. Clean Them Regularly
If you cannot get satisfactory results after the first cleaning, you can repeat the process until the leather is thoroughly cleaned.
Cleaning the leather car seats will need to be done regularly if you want to have satisfactory results.
This will also work to ensure that you will not have to put in a lot of effort when cleaning the leather seats any other time, as the formation of stubborn stains on the leather will be prevented.
This video also helps you:
How To Remove Dye Stains From Leather Car Seats
The dye is one of those substances that becomes stubborn when it comes into contact with something; in this case, the leather on your seats.
However, this can be removed just as you remove stains from leather, and you might need a little persistence, and you will get the dye removed as soon as you can.
The process of removing dye from the leather seats is as follows:
- Pour polish on the dye on the leather and give it time to sink in.
- Dry that spot with a clean rag and check for the presence of stain.
- Another way, Spray the spot with a water-based hair spray and let it settle.
- Wipe the spot with a clean rag.
- Mix vinegar and water and dip a cloth in the solution and wipe the spot with the mixture.
- Dab the dye until the stain comes off the leather and have a clean rag on the spot for a quicker dry.
- Spray LTT Maxi cleaner on the spot and give it half an hour to settle, wipe the area with a rag until all the dye comes off.
Conclusion
For you to enjoy every minute you spend in your vehicle; you will need to clean every component including the leather car seats.
This will ensure that you have a comfortable time and that passengers who enter the vehicle will not be irritated.
Moreover, when the leather seats are cleaned regularly, they will be attractive and may also last for a long duration as you use them in the vehicle.
Source:
1. Car Bibles – https://www.carbibles.com/how-to-clean-leather-car-seats/